How to Make a Cappuccino That Tastes Like It Came from a Café
There’s something magical about a perfectly made cappuccino—the rich espresso, the velvety steamed milk, and that luxurious foam topping. But here’s the best part: you don’t need to be a barista to make one at home.
In this guide, we’ll walk you through exactly how to make a cappuccino like a pro, even if you’re a beginner. We’ll cover:
✅ The right ingredients & equipment (including budget-friendly swaps)
✅ Step-by-step brewing & frothing techniques
✅ Pro tips for café-quality results
✅ Common mistakes & how to fix them
By the end, you’ll be sipping a homemade cappuccino that rivals your favorite coffee shop’s. Let’s get started!

What is a Cappuccino? (And Why You’ll Love Making It at Home)
Before we dive into the how-to, let’s talk about what makes a cappuccino unique.
The Anatomy of a Perfect Cappuccino
A traditional cappuccino consists of three equal layers:
| Layer | Description |
|---|---|
| Espresso | A strong, concentrated coffee shot (1-2 oz) for the base. |
| Steamed Milk | Silky, heated milk (not too hot!) that blends smoothly with the espresso. |
| Milk Foam | Thick, airy foam that sits on top, creating that signature cappuccino texture. |
Cappuccino vs. Latte vs. Macchiato
People often confuse these drinks, but here’s the key difference:
- Cappuccino = 1/3 espresso, 1/3 steamed milk, 1/3 foam (stronger coffee flavor, thicker foam).
- Latte = More milk, less foam (creamier, milder taste).
- Macchiato = Espresso “stained” with a dash of milk (strongest coffee flavor).
Why Make It at Home?
- Save money (Coffee shops charge $4-$6 per cup!).
- Control ingredients (Choose organic milk, sugar-free syrups, or dairy-free options).
- Impress friends & family (Nothing beats serving a café-style drink at home!).
Now that you know what makes a cappuccino special, let’s gather your tools and ingredients.
What You’ll Need to Make a Cappuccino
Before we dive into the steps, let’s gather the essential tools and ingredients. The right equipment makes all the difference!
Equipment Checklist
| Tool | Why You Need It | Budget-Friendly Alternatives |
|---|---|---|
| Espresso Machine | Pulls a concentrated, rich espresso shot (the foundation of a cappuccino). | Moka pot, AeroPress, or strong brewed coffee. |
| Milk Frother | Creates the creamy foam that defines a cappuccino. | French press, handheld frother, or even a jar (shake and microwave). |
| Coffee Grinder | Freshly ground beans = better flavor. Pre-ground coffee loses aroma quickly. | Buy pre-ground espresso (but use it fast!). |
| Thermometer | Ensures milk is heated to 150–155°F (65–70°C)—the sweet spot for sweetness. | Use touch: Too hot to hold = it’s ready. |
| Pitcher & Cup | A stainless steel pitcher helps froth milk evenly. A preheated cup keeps coffee hot. | Any small saucepan and mug work in a pinch! |
Ingredients
- Espresso Beans – Look for medium-dark roast (Italian or espresso blends work best).
- Cold Milk – Whole milk froths best, but oat or almond milk can work with practice.
- Optional Extras – Cocoa powder, cinnamon, or flavored syrups for a personal touch.
Pro Tip: Always start with cold milk—it froths better than warm milk!

Step-by-Step: How to Make a Cappuccino (Like a Barista)
Now, the fun part—let’s make your cappuccino! Follow these steps carefully for the best results.
Step 1: Brew the Espresso
- Grind your beans – Use a fine grind (like table salt).
- Tamp the grounds – Press firmly into the portafilter for even extraction.
- Pull the shot – Aim for 25–30 seconds for a balanced flavor.
💡 Pro Tip: If using a Moka pot or AeroPress, brew strong coffee (about 2 oz).
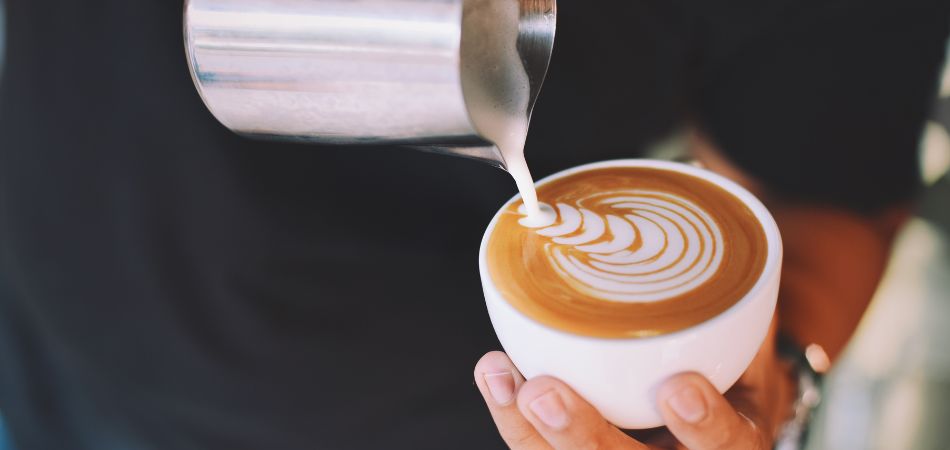
Step 2: Steam & Froth the Milk
- Fill pitcher ⅓ full with cold milk (whole milk works best).
- Position steam wand – Just below the milk’s surface (listen for a paper-tearing sound).
- Aerate for 3–5 seconds (to create foam), then submerge to heat.
- Stop at 150–155°F (65–70°C) – Any hotter, and milk loses sweetness.
💡 No steam wand? Use a handheld frother or French press (pump vigorously).
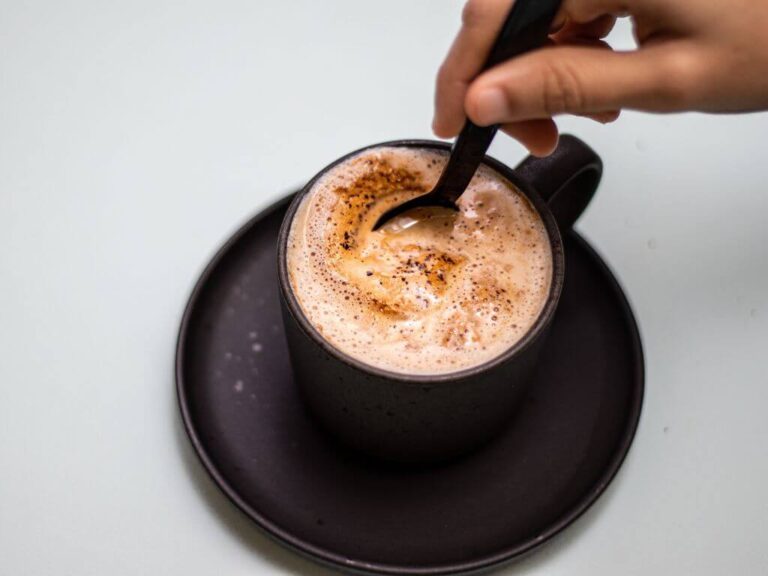
Step 3: Combine & Serve
- Pour espresso into a preheated cup.
- Add steamed milk, holding back foam with a spoon.
- Top with foam (about 1/3 of the cup).
- Optional: Dust with cocoa powder or cinnamon.
🎨 Want latte art? Swirl milk before pouring for a smooth base, then try a simple heart design!
Troubleshooting: Common Cappuccino Mistakes (& Fixes)
Even pros make mistakes—here’s how to avoid (or fix) them.
| Problem | Why It Happens | How to Fix It |
|---|---|---|
| Milk won’t froth | Wrong milk type (skim = less foam). | Use whole milk or barista-style oat milk. |
| Bitter espresso | Over-extracted (too fine grind/long brew). | Adjust grind size or shorten brew time. |
| Large, bubbly foam | Over-aerating milk. | Froth gently; aim for microfoam. |
| Milk too hot | Scalds (loses sweetness). | Use a thermometer (stop at 155°F). |
Delicious Cappuccino Variations
Want to mix things up? Try these twists:
1. Iced Cappuccino
- Pull espresso over ice.
- Top with cold frothed milk (use a handheld frother).
2. Flavored Cappuccino
- Add vanilla, caramel, or hazelnut syrup to the espresso before adding milk.
3. Vegan Cappuccino
- Use oat or almond milk (barista versions froth best).
Final Tips for Barista-Level Results
🔹 Preheat everything (cup, portafilter) to keep coffee hot longer.
🔹 Experiment with milk alternatives (each froths differently).
🔹 Practice makes perfect—don’t stress if your first try isn’t flawless!
FAQs
What are the essential components of a classic cappuccino?
A traditional cappuccino consists of equal parts of espresso, steamed milk, and foam, each making up one-third of the beverage. To enhance the flavor, consider adding 2 to 3 tablespoons of flavored syrups such as chocolate or vanilla, and top it off with a sprinkle of cocoa powder or cinnamon.
How can I improve the taste of my homemade cappuccino?
To make a more delicious cappuccino at home, follow these five tips: First, select coffee beans that suit your taste preferences. Second, grind the beans freshly for each cup. Third, extract a strong espresso, possibly a double shot. Fourth, opt for full-fat fresh milk, ideally from Swiss alp cows, avoiding UHT milk. Lastly, heat the milk to a maximum of 60-65 degrees Celsius.
Which type of milk is ideal for making a cappuccino?
Whole milk is recommended for creating a cappuccino with a rich and velvety texture. You can use low-fat milk as a substitute, but it may reduce the creaminess. Skim milk will produce a lighter, meringue-like foam that dissolves quickly.
What is the correct proportion of ingredients in a cappuccino?
The standard ratio for a cappuccino is one-third espresso, one-third steamed milk, and one-third foam. It is crucial to ensure that the temperature of the foam does not exceed 65-70 degrees Celsius (149-158 degrees Fahrenheit) to maintain the ideal texture and warmth.
Final Thoughts: Your Perfect Cappuccino Awaits!
Now you know exactly how to make a cappuccino—espresso, steamed milk, and foam in perfect harmony.
Ready to try? Grab your tools, follow the steps, and enjoy your homemade masterpiece.
💬 We’d love to hear from you! Tag us in your cappuccino photos.